You’ve got your new bowed instrument and are progressing through your lessons nicely, enjoying mastering new techniques as you go. Musical life is good!
However, your violin, viola, cello or double bass has suddenly started to sound unpleasant, has become difficult to play or is no longer staying in tune.
We’ve covered how to clean and care for your instrument HERE and shared top tips for caring for your bow HERE, so this time, let’s focus on your instrument’s fittings.
Your bowed instrument features many parts and fittings that all play a vital role in how it performs. Making sure your pegs, strings, bridge, chinrest and other essential parts are fitted and performing correctly will ensure your instrument remains comfortable, easy and fun to play.
Here’s some tips to consider as part of your maintenance routine…
Are Your Pegs Sticking or Slipping?
 Pegs secure and hold your strings under tension in the ‘head’ (or ‘pegbox’) at the top of the neck. They play a key role in the correct vibration of your strings and are turned to tune your bowed instrument.
Most bowed instrument pegs simply slot firmly into their accommodating holes, where they shouldn’t move. However, over time they can lose their natural grip and can start to slip. Conversely, if fitted too tightly, they will stick and be difficult to move. Both make your instrument difficult to tune and may be the reason it keeps dropping out of tune - which will soon see you wasting valuable time in your music lesson… more about how to avoid this HERE.
Peg paste is a great little accessory that you should always have handy in your instrument case. If your pegs are sticking or slipping, simply apply a small amount to the peg and re-fit. It’ll help resolve any issues and ensure your pegs continue to operate correctly. Always support the neck of your instrument when fitting and adjusting pegs.
This is all well and good, but what if we told you there's a way to no longer have to worry about applying peg paste and how your pegs are performing? Hidersine FineTune and Academy instruments feature Wittner FineTune pegs. These clever geared pegs are a genuine revelation, with seasoned professionals choosing to fit them to the very finest instruments. They have a traditional appearance but feature a discreet, internally geared mechanism that means tuning is quicker, more stable, and so much simpler for students too!
That means less time tuning and more time playing!
Changing & Fitting New Strings
 So, your pegs are in good condition and you’ve used peg paste when required, but your instrument is still slipping out of tune. This might sound obvious, but did you wind your strings on your violin, viola, cello or double bass properly when you last changed them?
You might feel a little apprehensive to change your strings for the first time, but don’t worry, it’ll become second nature once you’ve done it a few times. Ensuring you know the best practice from the get-go can only be a good thing though so, focusing on the violin, let’s cover how to do this correctly.
- STEP 1: Change One String at a Time. Keeping the other three strings fitted and under tension, change one string at a time. Removing all strings at the same time can cause your violin sound post to drop (more on this below) and will mean you’ll need to reposition your bridge correctly as you go.
- STEP 2: Thread the String into the Peg. Locate the hole that runs through the centre of the peg and thread your string through. Top tip… Make sure you don’t confuse your pegs and end up installing your D string into the G peg, for example. (Another reason to change one string at a time). Once the string is threaded, check your peg alignment. You may need to push the peg into the pegbox or move it out a little to ensure it lines up correctly relative to the other three strings and that no strings cross over each other.
- STEP 3: Wind the String. Begin winding the peg slowly onto the peg, ensuring you wind the left pegs (G and D on violin) anti-clockwise and your right pegs (A and E) clockwise. Wind the initial loop towards the narrower point of the peg, then cross the string over the first loop and continue to wind the remainder of the string towards the opposite, wider end of the peg. This will create a good anchor for the string, locking it into the peg which will help to stop it from slipping. Continue winding towards the wider end of the peg, creating a tidy row of string coils that sit next to one another rather than crossing over each other. Wind until the string coils are close to the edge of the pegbox but not touching it.
- STEP 4: Attach to the Tailpiece. Now that your string is anchored in the peg at the pegbox, you’ll need to run it down the fingerboard, over the bridge and attach it to the tailpiece. Run the string between your index finger and thumb to make sure it is not twisted before attaching the ball or loop end into the tailpiece.
- STEP 5: Tighten & Remove Slack. Now your strings are anchored at both the peg and tailpiece, you can turn the peg to remove the slack and tighten the string. Check that your string isn’t caught or looped around any other parts or fittings and ensure it is seated in the correct slots at both the nut and bridge as your carefully tighten. Most violin E strings feature a bridge protector – a small piece of plastic tubing that slides along the string. Make sure to position this in the bridge slot before fully tightening. It is designed to stop the E string buzzing. Don’t worry about tuning the string at this point – you’ll want to do this once all new strings are fitted. Just make sure it has sufficient tension to hold its correct position at this stage.
- STEP 6: Check Your Bridge. Once you’ve fitted all fours strings and they’re under tension but not fully tightened and tuned, check your bridge is positioned correctly. You can learn how to do this in detail below.
- STEP 7: Tune Your New Strings. Start by loosening your fine tuners in the tailpiece. Generally, our Hidersine student and beginner violins feature four tailpiece tuners and our instruments designed for more advanced levels and players feature a solitary fine tuner on the E string. Using a pitch pipe, tuning fork, or electronic tuner, pluck the string to check its pitch. Tighten the string using the peg until it reaches the desired pitch. Make sure you don’t over tighten the string beyond its correct pitch. Once all four strings are tightened and at the correct pitch, you’re good to go. You may find that your newly fitted strings go out of tune a little at first. This is normal and a result of them naturally stretching. You can use your fine tuners at your tailpiece to make small incremental tuning adjustments where required. Turn your pegs to make larger tuning adjustments.
Not sure what all the parts we’ve just referred to are? Don’t worry, here’s our handy guide to the different parts of the violin. Take a look HERE.
Adjusting Your Bridge
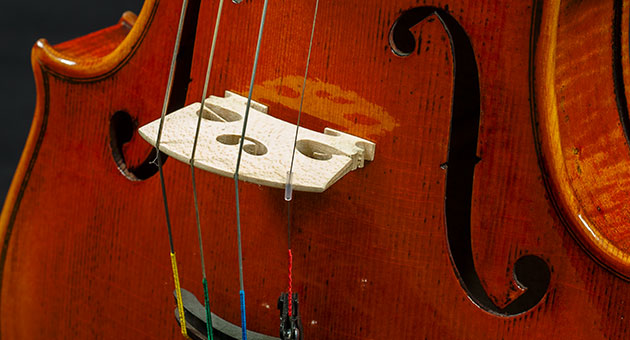 Getting into the habit of regularly checking your bridge is fitted and aligned correctly is a sure-fire way to keep your instrument sounding and feeling great to play. Your bridge can easily move and will tip forward if your strings are wound too tightly. Always make sure its feet are flat against your instrument’s table and that it is positioned in the correct place on the table.
Your bridge should be straight and parallel with the notches in the centre of both f-holes either side of it. These f-hole notches are not just for decoration, they’re a useful guide to help you position your bridge in the correct place on your instrument table.
Always take care when adjusting your bridge that your strings aren’t too tight. Trying to move your bridge when under too much string tension can damage your bridge, mark the table of your instrument, or even worse – cause the table to split. It’s a good idea to loosen your strings slightly before making your bridge adjustments.
When to Replace Your Bridge
There will come a time when you need to replace your bridge. So, what are the tell-tale signs?
Over time, the ridges across your bridge upon which your strings sit may become worn and too deep. This will stop your strings vibrating properly and is a common cause for why strings and notes suddenly sound choked, broken or less resonant. You’ll spot that your instrument may become harder to play and you’re working harder with your bow to produce a decent sound. Again, your bridge could be the culprit.
Luckily, a replacement bridge won’t cost you much and you’ll be glad you did as your instrument will feel and sound much better for it. Here at Hidersine, we have a comprehensive range of bridges – take a look HERE.
Uncomfortable? Let’s Check Your Chin & Shoulder Rests
 Ask any experienced violinist or violist what they found difficult to get to grips with when they first started playing their instrument and we bet they’ll mention their chin and shoulder rests. Holding and positioning your violin or viola correctly on your shoulder and chin feels strange and unnatural the first few times you do it. This is totally normal and something all beginner players experience, so don’t get too hung up on it. Remember, the more you pick up and play your new violin, the faster you’ll feel totally at one with it.
The chin rest is a curved piece of wood or composite material that is attached to your violin at the base, alongside or covering the tailpiece. Originally designed in the Nineteenth Century by German musician Louis Spohr, the chin rest was initially conceived as a method for protecting the violin’s delicate tailpiece, but performers soon realised how it could be used to rest their chins on and make the violin easier to hold and play.
The shoulder rest attaches to the back of your violin and rests on your shoulder and collarbone. It serves two primary functions. Firstly, it makes your violin more comfortable to play and enables correct posture – helping you avoid injury. Secondly, it prevents your violin from slipping on your shoulder and therefore assists your performance of fast and technical playing where your body is naturally moving energetically and rapidly.
The chin and shoulder rest you decide to use is often a personal choice and you may find that the rests fitted to your instrument as standard aren’t quite suited to your body or the way you like to play. This is normal, and luckily, it’s easy to remove and change these fittings. There are a few considerations and checks you can perform to make sure you’re using both rests correctly first though.
- Are They at the Correct Height? If your chin rest is too high or too low, you’ll soon feel discomfort. If you have short neck, you’ll ideally want a lower chin rest, and if you have a long neck, a higher chin rest will likely feel more comfortable. Similarly, if your shoulder rest is too high or too low, it can force you into an improper playing posture which will make you uncomfortable and impact your playing.
- Are They Positioned & Shaped Correctly? You want your chin to form a snug fit in your chin rest, resulting in minimal movement. If you’re someone with a small chin, it’s likely you’ll need to use a chin rest with a smaller, deeper scoop or bowl. In the same regard, a smaller framed person will generally find a smaller, narrower shoulder rest more comfortable as opposed to a larger shoulder rest designed for broader shoulders.
It’s important to note chin rests are available as side and centre fit options. Centre fit chin rests sit directly above the violin tailpiece and side fit rest are located to the side of the tailpiece closest to your face. Again, this is personal choice, and you’ll soon discover how you prefer to hold your violin and which you prefer.
A quick note on fitting and positioning… if your instrument is producing an annoying buzzing noise, your chin rest could be the culprit. Make sure your rest isn’t touching the tailpiece – this is often the reason violins sometimes hum or buzz.
Hidersine violins and violas come complete with chin rests and shoulder rests designed with your comfort in mind. A combination of appropriate materials and ergonomically shaped designs ensure you won’t be battling with either of your rests and can instead focus on your playing. For students and beginners, our Hidersine Vivente Academy instruments feature Wittner hypo-allergenic chin rests specially designed and positioned to ensure the maximum comfort for new players.
Remember that your experienced music teacher or local bowed instrument store is on hand with expert guidance to help you find your perfect chin and shoulder rest if you feel uncomfortable playing your instrument at any point. Make sure to ask their opinion rather than continuing in discomfort.
Pay Attention to Your Sound Post!
The sound post in your instrument is a piece of wooden material located inside the body under the bridge that carries vibrations from the top (or table / soundboard) to the back of the instrument. Although not visible on the exterior of your violin or other bowed instrument, it is an essential component – often described as the ‘soul’ – that allows the instrument to resonate and produce a full and complete sound.
As the soundpost isn’t permanently fixed in place - rather, it is held tight by friction between the top and back pieces of wood, it can sometimes move out of position or fall completely. You’ll soon spot if your sound post has fallen or moved as your instrument’s tone will suffer and it’ll sound dull, less resonant, and quieter. If you hear something rattling around inside your instrument, that’ll most likely be your sound post that has fallen completely.
As the sound post is located inside the body of your instrument, it can be tricky to correctly reinstall and it’s always advisable to take your instrument to your local bowed instrument store or luthier to fix.